This bathroom makeover has been one of my most pinned projects ever, so I thought maybe some of my new followers would enjoy seeing it. This was my previous home and this makeover took place in 2014. I had a plain jane builder grade bathroom that needed some glitz and charm on a strict budget. There are some great DIY projects in this makeover that will work in any bathroom.
When redoing my hall bathroom, I had originally planned on a more elaborate makeover, however with some thrifty treasures and just shopping the house I wound up with the look I was going for. All for about $100. I am thrilled with the finished room and so glad I put creativity to work instead of $$$$$$.


As you can see, this is a really small room, but I still wanted it to be chic and have some style. These were the accessories and shower curtain from my last house. Not bad, but not me anymore and I really wanted a change.

Most of the redo was strictly cosmetic other than removing the medicine cabinet. (See how tacky this thing was.)
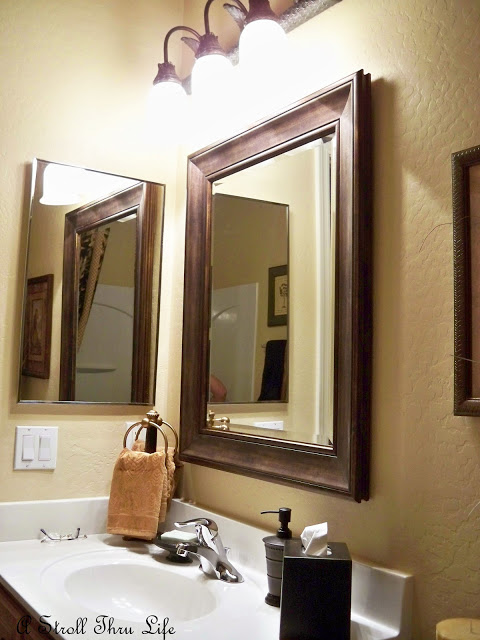
There was no room to hang a towel and it just dated the room, so it had to go. I removed it, patched it with a piece of sheetrock,

then taped and textured to match the rest of the wall. I had leftover paint so I just blended it in.
You can see the complete tutorial here.

With that done, I was ready to start with the new accessories and make it pretty.
The shower curtain is made from leftover fabric I already had that was used as the topper for the familyroom drapes. There is a second rod layered behind with a regular shower curtain. Both go to the ceiling which creates the illusion of more space and adds a little drama too. You can see how I layer them on this post.

Transferware dishes and a painting I already had are used for artwork. (Sorry for the funny lighting and shadows. There isn’t a window, so I brought in a light and placed it inside the tub so I could get a better shot of everything and the colors too.)

A favorite painting in an onate frame adds some unexpected glam. (It is actually a print and has non-glare glass over it which gives it the look of an oil. The glass will protect it from any moisture.)

I always look at Ross and TJMaxx for affordable towels and I found some really pretty ones to layer together. I kept the color scheme just gold and cream.

This pretty little art work I found at Goodwill some time back works perfectly with my new design.

The medecine cabinet gone and a towel bar and picture in it’s place. So much better, don’t you think? I also hung some of the new towels on the guest rod behind the door. This is perfect when space is limited to hold extra towels when a guest needs them.

The accessories that I had already ordered from Restoration Hardware arrived. They give the room an additional touch of class. I love the frenchy design in silver and gold

Isn’t the apothecary jar stunning.

In a small bathroom you need all the storage space you can find. The top of the tank is round, so I made a tank topper tray to hold some of my accessories.

You can see the tutorial of how I made it on this post.

The old builder grade leaky faucet really had to go.

This is the new one from Pfister. It is stunning and every single detail is totally exquisite.

The faucet is the jewelry of the room and this one is so elegant, the perfect finishing touch.


From a jungle theme to – – –
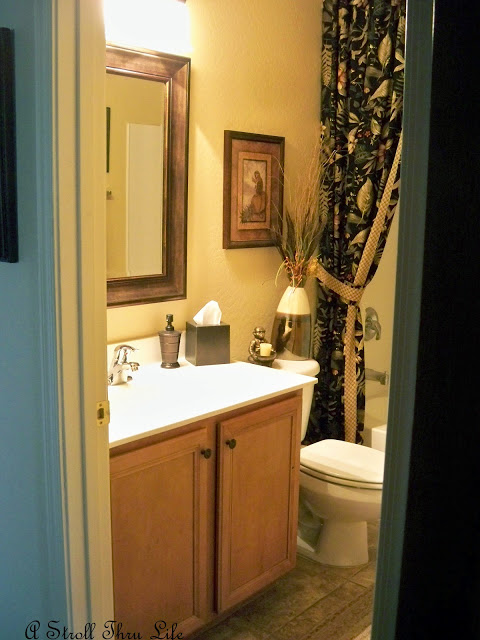
elegance and sophistication.

Here’s the breakdown of the costs –
Fabric I already had leftover from the topper to the familyroom drapes=0
Artwork that I found at Goodwill several months earlier=0
Paint for the mirror I already had=0
Touchup paint for the bathroom I already had.=0
Restoration Hardware accessories I had already ordered – $63.93
Things I bought and money spent –
Repair of the sheetrock where I took the medecine cabinet out=$21.04
New towels.=$24.63
Artwork from Goodwill above towel bar =$3.99
So all in all just over $100. I can live with that.
If you like Thrifty & Chic on a Budget, I would love to have you follow me.
Have every post delivered to your inbox with Bloglovin
Check out Pinterest & See behind the scenes on Instagram

Subscribe to Blog via Email